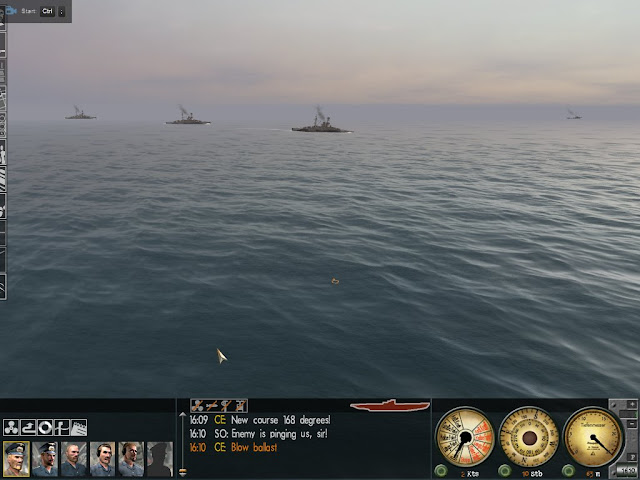
Immediately after the release of the torpedoes the ship came to the surface due to the sudden discharge of weight (approximately four tons), and it was nearly rammed by the third ship in the line, the HMS Valiant. Von Tiesenhausen crashed dived and in the subsequent descent the depth gauge malfunctioned at 250 feet, while the ship dove past 800 feet (exceeding a Type II crush depth of 650 feet). In order to save his boat and crew he blew ballast to emergency ascend and regain some control of his ship.
My encounter in the scenario played out somewhat differently, however with the same result: the sinking of a single capital ship.
For this outing I am taking a 1941 VIIC U-Boat at 49%
realism (the default normal setting is 29% realism: I disable a few more things
to heighten the challenge).
This array of enemy ships is directly in front of my
position and is structured to mirror the real life situation Von Tiesenhausen found
himself in.
The three capital ship targets all bearing down towards me:
the Queen Elizabeth, the Barham, and the Valiant.
My weapons are four forward and one aft torpedo. Tubes one & two contain T I (G7a) gas torpedoes which have a range of 5/7.5/12km
depending on the speed setting (fast/medium/slow) but leave a visible wake of
bubbles on the surface.
Tubes three & four contain T II (G7e) electric torpedoes
which have a single range of 3km at 30 knots. Although not the best electric
torpedo of the war, it did not suffer the visibility issues that the gas/steam
fish did.
The initial contact reading I had on the target that I
selected was a Revenge class battleship, which has a draft of 8.5 meters. I set
tubes three and four (the electrics) to a depth of nine meters and a magnetic
pistol (to allow for detonation under the keel of the ship without requiring a
contact impact strike).
With destroyers buzzing about I raise the periscope and fire
two fish at the lead capital ship in the line. The red ship symbol near the
gauges is a lower difficulty cheat of sorts to alert the player that they have
been detected by the enemy (it can be disabled to incrementally increase game
play difficulty).
One of two fish sails underneath the behemoth and detonates.
Once in a while the explosion will crack the spine of the
ship and it will immediately sink, but that did not happen in this initial
engagement.
After firing the initial two fish at the ship I had ordered
a crash dive, but with no one standing between me and the target I reverse that
decision and blow ballast to begin an emergency ascent that I will cut short
near periscope depth.
This maneuver pays dividends elsewhere as a passing
destroyer lobs several depth charges my way set for the depth I was detected at, not the
one I am heading towards.
Tubes one and two are the gas/steam torpedoes that leave a
visible wake, so I have them set to fast speed and a 3 meter depth with an
impact pistol to allow for detonation on contact. I fire two fish at the
crippled battlewagon.
Unfortunately I had inadvertently targeted one of the
destroyers than ran across my scope and the two fish split left and right.
The destroyer just gets passed the screaming torpedo but the
battleship takes a direct strike on the starboard side. I order another crash
dive and a double turn to port to evade the search and destroy mission playing
out on the surface.
While I am tempted to fire a fish at one of the other
battleships lingering about, I focus on the disabled target. The realistic
reload times selected in the difficulty panel are a real bitch while in game, and I don’t
feel like waiting around with destroyer’s depth charging me.
I want to finish
off the one I started, and get out of town.
Once tube three is reloaded and comes online, I configure
the fish at 10 meters depth (to allow for the settling of the ship since taking
on water from earlier strikes) and a magnetic pistol to float it under the keel
again.
At 1,500 meters directly aft I fire and then crash dive again.
Although it took me three engagements, the third time is the
charm as this fish finds the mark and breaks the back of the giant vessel.
It slips below the surface to never be seen again.
There are a couple of mods out that enhance the data
reporting aspect of the game (such as telling you the name of the actual vessel
destroyed), however I am running Silent Hunter III stock with no mods at the
moment so all I get credit for is a 28,000 ton “Revenge Battleship”.
Having gone after the first capital ship in the line and sinking it, I would suspect it would have been the HMS Queen Elizabeth.
After-action Report
And this is the extent of the award system (unlike the
dynamic campaign where you have a shadowbox for medals and clasps). The U-Boat
lost message above is an error in that my ship was perfectly fine – I chose to
end the scenario after achieving the primary objective.
If I lost my boat, I wouldn’t
have 46 healthy crew at the end.
Post Mortem
This mission was played on 7/14/15 on a Windows 7 machine. The total play time was 19 minutes. As there are only ten single player scenarios in the game, I may continue this as a Campaigns item.


No comments:
Post a Comment
Note: Only a member of this blog may post a comment.