

Each mission offers up an “Aftermath” dialogue at the beginning which details what would have happened in a real life event: in this case the attack on the launcher caused some damaged, but the Soviet paratroopers were not able to secure the launch code books.
Game Options

Everything is unchecked except for FSCC control (which allows subordinate AI to utilize indirect fire support during turn resolution) and LOS checks (which allows the human player to evaluate the tactical feasibility of a specific hex).
Note: I have modified the following in the Game Colors 1 panel: Map Cursor has been changed to orange, and Unit Movement Path has been changed to blue. This makes it easier for me to see on the map during game play.
Critical Unit

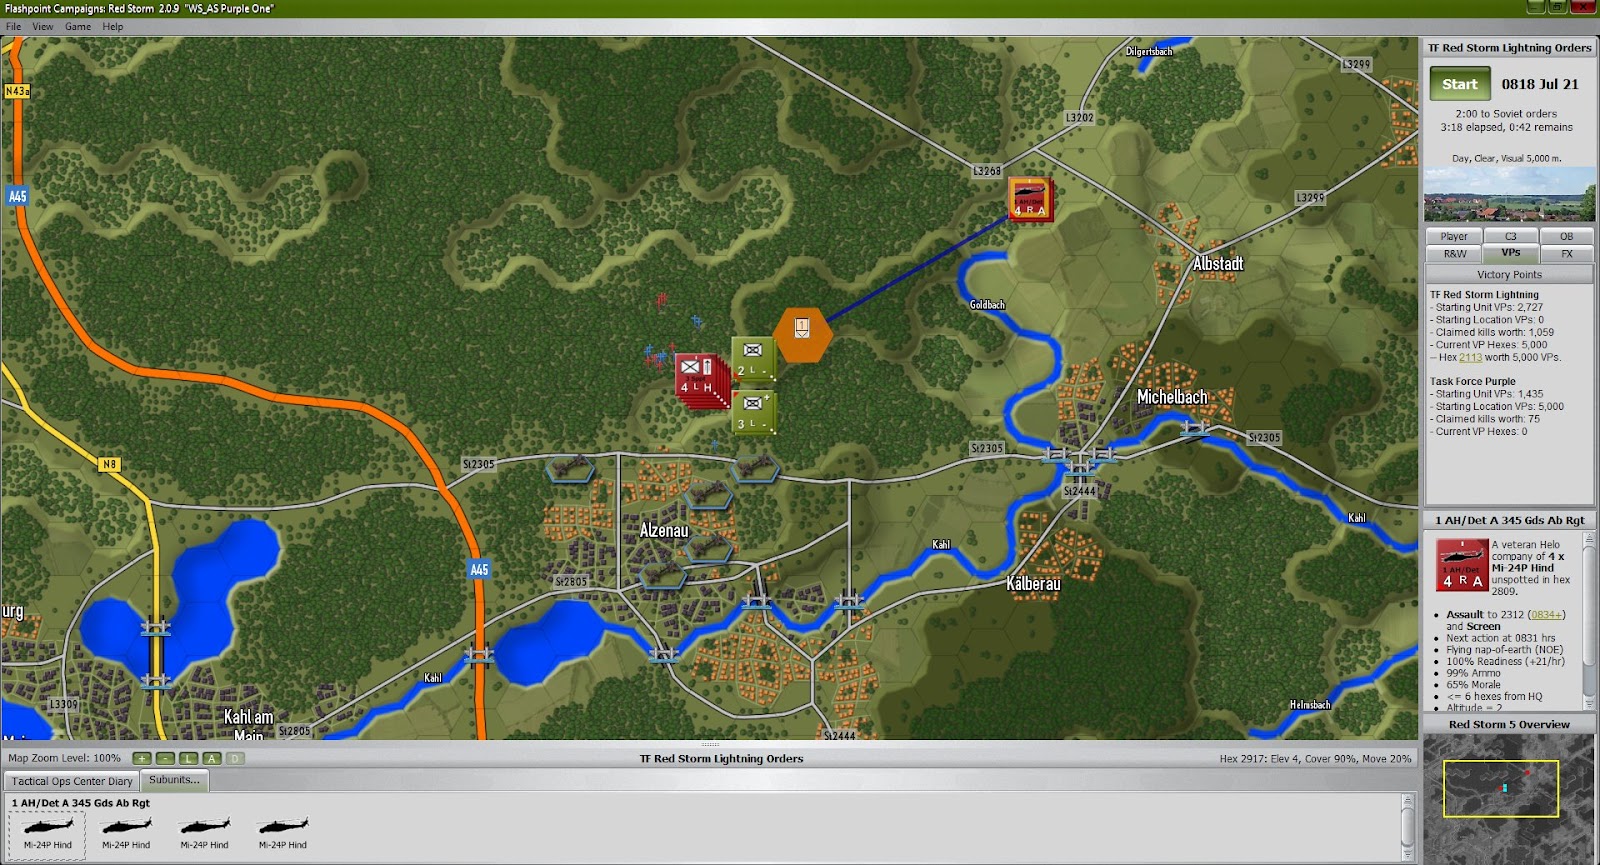
The Mi-24P Hind Attack Helicopter is a versatile air asset that has multiple special abilities and countermeasures. I will have one flight of four Hinds available from the start that is rated at Veteran status, and they are worth 62 Victory Points each (a very expensive unit that must be used judiciously).
Other Forces
I will also have at my disposal as the main attacking force three platoons of elite Rifle Infantry (7 VP each), and three companies of AT Infantry (4 VP each) featuring the 73mm SPG-9 recoilless rifle.
There are a number of other units that show as later turn reinforcements which are grouped under an “Added Points HQ” however these will not come into play by the end of the scenario.
Objectives

The Americans are presently in control of the single objective location at hex 2113 which is worth 5,000 Victory Points. The Soviets begin with 2,727 Starting Unit Victory Points while NATO starts with 1,435.
Pregame Setup Phase One

There are eight separate deployment areas for the forces to be positioned at. The seven that ring the objective are effectively landing zones for the Soviet paratroops. As this is a timed scenario at 4:00 hour’s length there is no reason to start any of the forces in their original location when there are much closer hexes available.
Pregame Setup Phase Two

I choose to group all of the parachute infantry into a single hex and issue an Assault movement route that utilizes the terrain cover and concealment to maximum effectiveness. Stacking the units is not a gamey move in my opinion as it allows for them to project maximum force forward in a coordinated manner. Breaking them up into separate groups substantially weakens their ability to attack in a cohesive manner.
Sadly the Mi-24P Hind begins the scenario in a low ammunition state so I place it next to the HQ and order it to resupply during the first couple of turns.
Lastly the HQ is given a Hold order to prevent it from moving about.
Combat Action

Turn 1: After the first 26 minutes the parachute infantry units have begun to move out from their LZ as the Hind attack helicopter continues to resupply at the HQ.
The Soviet Command Cycle is presently four minutes faster than the NATO cycle, which means that I can give new orders quicker than the enemy can at the moment (this will shift during game play).

Turn 2: The Hind is rearmed and is ordered to assault forward towards the objective. The preferred standoff range of this unit is six hexes, so I pull up short approximately two hexes from the Victory Point marker in order to use this unit cautiously as their loss to antiaircraft fire will greatly affect the outcome of this scenario (as each Hind is worth 62 VP).

Turn 3: the probe was very successful in that there were four NATO mechanized infantry units destroyed and no loss suffered by the helicopters, which return to the HQ to resupply.

Turn 4: the Hind is rearmed and again brought forward in a similar fashion as in turn 2, as the parachute infantry have made their way across the ridge and are about to pivot south towards the objective.

Turn 5: the parachute infantry is fully engaged in combat as the Hinds return to the HQ for resupply.

Turn 6: during the turn the parachute infantry would seize control of the Victory Point hex 2113, however I receive a High Command Intervention notice that the enemy has suffered losses and withdrawals exceeding 70% and is reorganizing on the battlefield.
If I were to end the scenario here NATO would regain control of the single Victory Point objective area and I would lose with a 17% Tactical Loss rating. Frankly I do not understand the logic behind this, and after having fought for control of the objective area I will definitely not just hand it back over because the other side is worn out.
At the end of turn six I order the Hinds to attack forward once again. With only 42 minutes left in the timed scenario and the current Soviet Command Cycle up to two full hours, this is the last order I will be issuing.

The scenario ends at the 4:00 mark as scripted by the
scenario designer.
After-action Reports

The Soviets finish with a 99% Decisive Success rating with forces at 96% of starting. The Accumulated Victory Points difference is a lopsided 5,970. NATO could only manage 89 VP from enemy losses, so protecting the VP expensive Hinds was critical to this outcome.

The Reported Kills and Claims tab reveals the standout unit to be the flight of four Mi-24P Hind attack helicopters, accounting for eight kills at the loss of not a single airframe.

This is a new reporting panel for me, and frankly I do not understand the last line “Control will pass to NATO”: perhaps this is an updating issue or something.

This is the enemy Staff Summary Report (also a new panel for me), indicating their abysmal performance.
Review Final Situation

A Cossack Too Far: being six hexes from the HQ the parachute infantry were unable to resupply and as a result their readiness and overall combat effectiveness were drained substantially. However the outcome is ultimately what is important here: the Hind sorties were really a game changer, and had I pressed them and lost that asset I very well may have lost the entire scenario.
Post Mortem
I wanted a small scenario to get into the new game with in order to figure out how a blog post AAR would work out, and this mission certainly fits the bill. It shows the versatility of the game engine in that although the main focus of the platform is armored combat, it has sufficient depth to convincingly depict infantry and air assault operations.
However the variable weather conditions during the scenario were absolutely annoying, changing multiple times per turn with huge swings in visibility (I wish there was a way to disable the popup notifications).
I intend to blog about this game, however at this point I am not sure if it will be campaign driven or single missions, or both. My goal is to finish the original game Flashpoint Germany, which I am currently posting weekly on each Monday (it may be some time before the next Red Storm AAR as a result).
This game was played 10/19/15 on a Windows 7 machine.
Thanks!! I did not have a clue how to play this as Warsaw Pact; I thought all the extra helos were supposed to be used.
ReplyDeleteWhen I tried it with spread-out units, 3 of my 4 helos got shot down by the Bradleys. I wonder why that did not happen to you, but I will experiment.
thanks again for the AAR.