

I previously played this scenario as the Warsaw Pact and obtained a Tactical Victory outcome.
Game Options

I am playing the scenario in full 30 minute (simulated) turns. There are a total of 20 turns and the game will take the full amount to complete.
Realism Options

NATO units are intended to use stealthy movement by default which enables them to utilize any available local cover and concealment to optimal advantage while moving. WARSAW Pact forces typically put a premium on high speed movement and overall formation cohesion so they would generally not utilize stealthy movement
Order of Battle
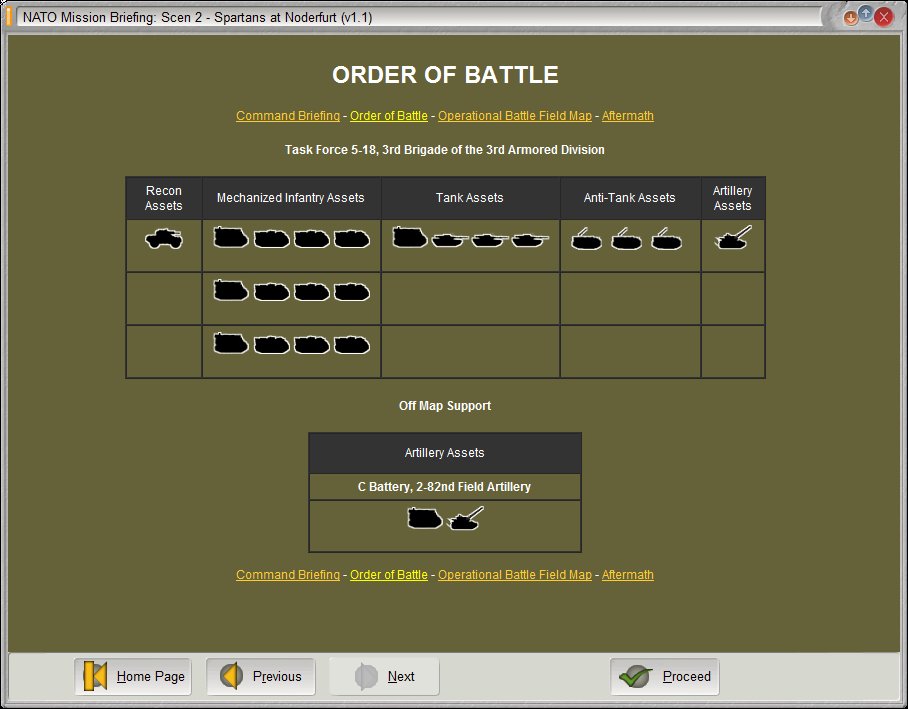
There are a number of screens relating information regarding the scenario before the game begins, one of them being the OOB for the friendly forces. Here I have Task Force 5-18, 3rd Brigade of the 3rd Armor Division consisting of a headquarters section, three mechanized infantry battalions, a tank battalion, three platoons of anti-tank vehicles, as well as off map assets in the form of artillery.
Critical Units

The M1A1 Abrams is a first line Main Battle Tank that features a 120mm main gun and a unique combination of special characteristics that give it an edge over the Soviet MBT.
For this scenario I will have a total of 12 M1A1 MBT’s as front line units.

The M901 Hammerhead is a self-propelled AT vehicle that features two TOW anti-tank missiles.
For this scenario I will have a total of 12 M901 vehicles as front line units.

The M2A2 Bradley Infantry Fighting Vehicle is a first line IFV that features two TOW anti-tank missiles, 84mm and 66mm anti-tank rockets, as well as a 25mm autocannon.
For this scenario I will have a total of 36 M2A2 IFV’s as front line units.

The M109 A2/3 155mm Howitzer is a self-propelled medium artillery vehicle that features smoke, chemical, FASCAM, as well as the devastating 155mm round.
For this scenario I will have a total of eight off map M109 howitzers.
Pregame Setup Phase One

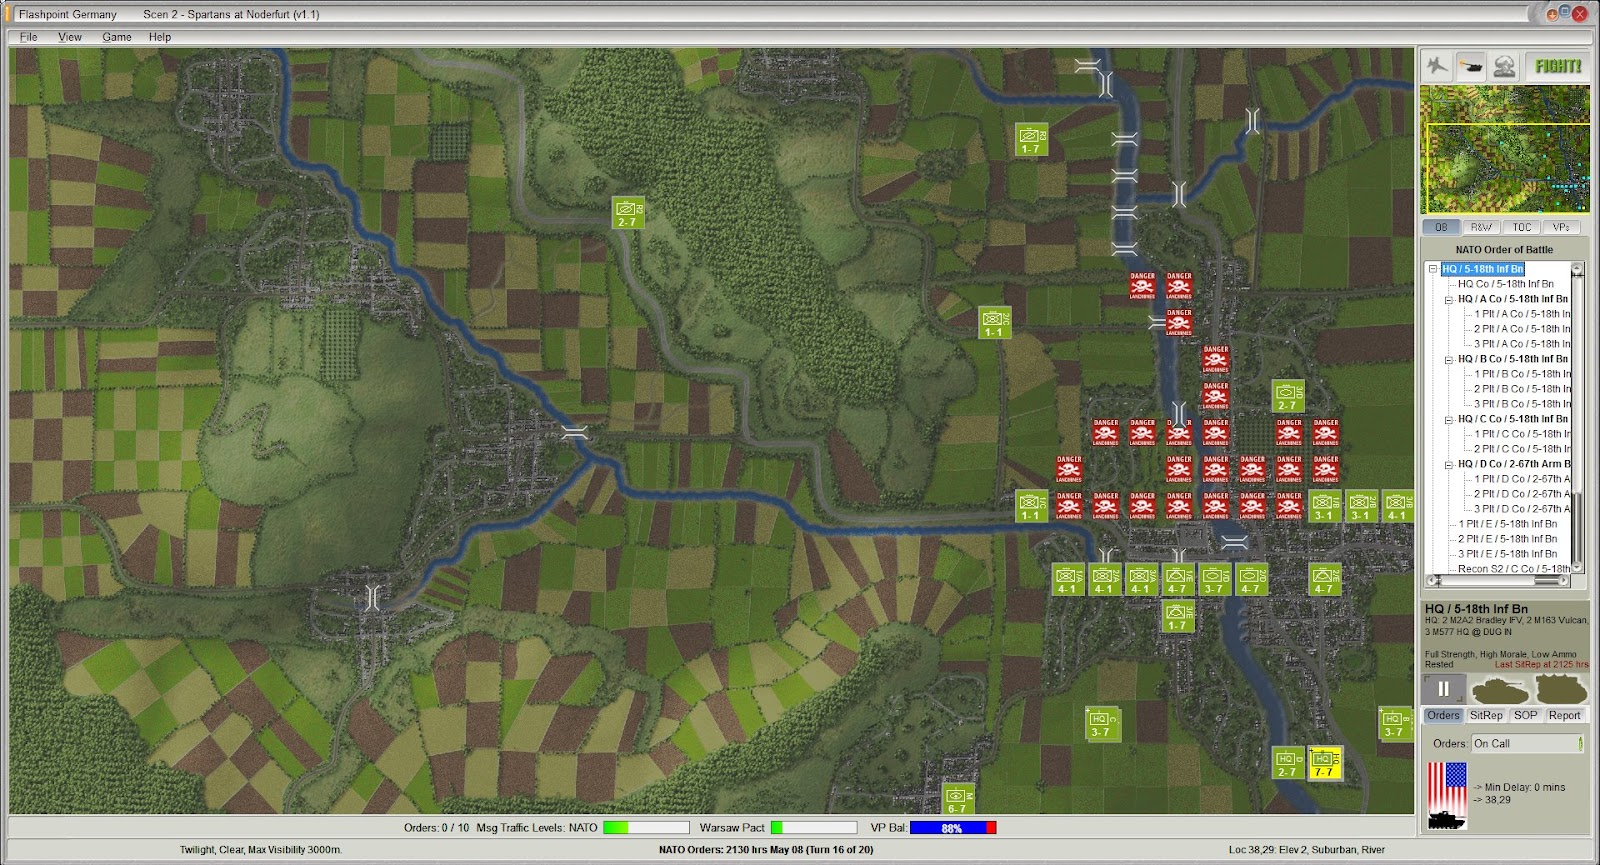
This is the pregame setup phase where I can take the default disposition of forces and drag and drop them where I like within the blue bounding box. The game map replicates an area of the western portion of the Federal Republic of Germany measuring 20 km X 15 km, while each grid square represents 500 meters.
Objectives

NATO has Victory Points available only in Sector 12 (50). The Warsaw Pact has points available only in Sector 12 (175) as well. I can win this decisively if I keep the Soviets from occupying and clearing Sector 12.
Pregame Setup Phase Two

My entire force is kept within the confines of the blue bounding box with no orders to move from their dug in positions. The IFV battalions and the tank battalion are arranged with the frontline units forward and the HQ unit toward the rear (which will allow it to scoot out of harm’s way based on the SOP doctrine in effect).
The minefields are rearranged and additional FASCAM is ordered deployed at the indicated grids.
If the Soviets want to retake this river crossing, they are going to pay dearly for it.
Combat Action

At the end of turn one, the FASCAM deployment is complete and no contact with the enemy has been made, however I lost two off map artillery tubes to counterbattery fire.
Losses
NATO = 2
Warsaw Pact = 0
Additional Orders
The three reconnaissance units (consisting of two M3 Bradley Cavalry Fighting Vehicles each) are sent out to scout for the main body of the enemy force, as well as to detect any potential flanking attempts.

At the end of turn two, the two northern moving recon units have sighted and revealed on the map a massive array of Warsaw Pact forces heading south directly into my entrenched position.
Losses
NATO = 4
Warsaw Pact = 3
Additional Orders
FASCAM is deployed at the indicated positions.

At the end of turn three, the Soviet forces have all but eliminated one of my mechanized infantry battalions but at a steep cost to their own forces.
Losses
NATO = 14
Warsaw Pact = 34
Additional Orders
FASCAM is deployed at the indicated positions.

At the end of turn four, the NATO forces seem to be holding their ground for the most part while inflicting substantial damage to the enemy.
Losses
NATO = 15
Warsaw Pact = 51
Additional Orders
FASCAM is deployed at the indicated positions.

At the end of turn five, the situation for the Soviets is looking dire as the minefield deployments have wreaked havoc on their advance.
Losses
NATO = 18
Warsaw Pact = 90
Additional Orders
FASCAM is deployed at the indicated positions.

At the end of turn six, the Warsaw Pact forces have not made any significant breakthrough and appear to be incrementally picked to pieces by my entrenched armor units and the deployed FASCAM.
Losses
NATO = 21
Warsaw Pact = 98
Additional Orders
FASCAM is deployed at the indicated positions.

At the end of turn seven, there has been no significant change in the overall battle as the Soviets continue to be on the losing end of an attrition war.
Losses
NATO = 22
Warsaw Pact = 107
Additional Orders
FASCAM has been depleted so the artillery unit is placed On Call.

At the end of turn eight, I am beginning to wonder how much more the enemy has to throw at me before they fall below 20% strength (and trigger the game end offer).
Losses
NATO = 23
Warsaw Pact = 114
Additional Orders
No additional orders have been issued at the end of this turn.

At the end of turn nine, a group of Soviet vehicles had managed to penetrate my line and make it to the second layer of defenses, however even though they destroyed several M1A1 Abrams MBT’s the entire group was eliminated during the turn.
Losses
NATO = 26
Warsaw Pact = 147
Additional Orders
No additional orders have been issued at the end of this turn.

At the end of turn 10, there were a number of kills claimed for the minefield deployments, and only one enemy unit was revealed.
Losses
NATO = 26
Warsaw Pact = 154
Additional Orders
No additional orders have been issued at the end of this turn.

At the end of turn 11, the situation remains steady as NATO continues to whittle away at the Warsaw Pact assault as it breaks and dissipates.
Losses
NATO = 27
Warsaw Pact = 162
Additional Orders
A recon unit is ordered to move north in order to reveal additional enemy units that the On Call artillery can engage.

No additional kills were claimed during this turn.

Fearing a “Where’s Waldo” finish to this 20 turn scenario, I dispatch an understrength M1A1 Abrams platoon to probe to the edge of the map and north in an effort to determine what is going on.

Night falls over the battlefield and I am content to let things stand where they are as the Victory Point Balance meter on the taskbar is at 88% and there is no appreciable (or detected) threat to my chokehold on the objective sector.
All quiet on the Western Front.

It is pitch black out there now and even though my forces have superior optics, there is no reason to risk losing additional units for a piecemeal kill here and there.

Just a few more turns…

Zzzz…

Hey wake up over there…

The game ends in a Decisive NATO Victory outcome.
A player wins decisively if he nets 180 points or more over the enemy. 105 points or more is a tactical victory, 30 points or more is a marginal victory, and any other result is a draw.
After-action Reports

The Staff Overview and Summary reveals the final score as 212-27, a difference of 185 points. The unit loss during this scenario was quite significant, with NATO losing 27 units and the Warsaw Pact losing 162.

The Tactical Operations Center Staff Diary details the number of survivors and the effectiveness of each unit.
The standout units of the battle were the M2A2 Bradley Infantry Fighting Vehicles of 2nd and 3rd Platoon, B Company, 5-18th Infantry Battalion, which accounted for a total of 44 kills for a loss of only one vehicle among the two platoons. Although they did not take out any Soviet MBT’s, they did destroy 25 APC’s and various other vehicles.
Review Final Situation

It seems as if the Soviets simply bogged down at the river crossing after becoming tangled up in the deployed FASCAM minefields and the murderous mutually supporting firing lanes. Although my contingent of IFV’s on the left flank was broken up significantly, the Warsaw Pact forces could not seem to exploit that area due to the lack of another near crossing point.
Post Mortem
Although this feels like one of the centerpiece scenarios of the game, it suffers greatly in that all of the action takes place on the right side of the map, and in particular in the bottom right section which was Sector 12.
The map section is used several times throughout the game, and this specific mission would have greatly benefitted had the developer taken the time to create a much broader map where the center of the action truly is the center of the map.
Forcing the player to an extreme corner of a map with no room to move creates false walls and severely detracts from the re-playability possibilities.
This mission was played on 8/23/15 on a Windows 7 machine.
Thanks for the AAR, sounds like a good game i maybe should check out !
ReplyDeleteUnfortunately the game has been discontinued on the Matrix website. There is a new game called “Flashpoint Campaigns: Red Storm” that is the spiritual successor, and it is available on Steam but I personally am waiting for a decent sale price before picking that one up.
ReplyDelete