

The task given to the 117th is to prepare for a defense of the Hunte River Bridge in the vicinity of Scheider while conducting repair and refit operations. This is a departure from the character of most Soviet scenarios where the Warsaw Pact is on the offensive in overwhelming numbers. Here the opposite is true: the Red Army must hold ground and repel an onslaught.
The scenario is a conversion from the original game Flashpoint Germany. In this incarnation I will be playing as the Warsaw Pact commander. Click here for my NATO AAR from that game for this scenario.
Game Options

Everything is unchecked except for FSCC control (which allows subordinate AI to utilize indirect fire support during turn resolution) and LOS checks (which allows the human player to evaluate the tactical feasibility of a specific hex).
Friendly Forces
8 Recce, 43 Tank, 80 APC, 54 Inf, 9 SP AT, 26 AT, 35 HQ, 20 AD, 24 SPArty, 12 Arty, 29 Utility, 4 Air, 1 WMD.
Enemy Forces
Elements of the mechanized 1st Brigade, 8th Infantry Division have been spotted by reconnaissance west of the Hunte River. The enemy force appears fresh, with high morale.
Critical Units

The T-80U [m] Main Battle Tank features a 125mm 2A46 smoothbore cannon as well as the AT-11 Sniper guided anti-tank missile. I will have 92 of these units at 101 Victory Points each for a total of 4,343 points (only three of these units are available during the first cycle).

The BTR-80 [g] Wheeled APC features a 14.5mm KPTV and 7.62mm PKT coaxial machine gun. Each unit transports the following infantry components: 9 X Mechanized Rifle, 1 X AT-4 Spigot, 1 X SA-14 Gremlin, and 1 X HQ. I will have 125 of these units at 18 Victory Points each for a total of 1,440 points (only 33 of these units are available during the first cycle).

The MiG-23MF Flogger is a variable-geometry (swept wing) fighter aircraft (performing CAS in this scenario). It features a 23mm GSh-23L autocannon, the AS-7 Kerry tactical air-to-surface missile, as well as 57mm rocket pods. I will have four of these aircraft as later cycle reinforcements at 81 Victory Points each for a total of 324 points.
Also during a later cycle I will have available a SS-21 SSM [N] surface-to-surface nuclear missile. However its use comes at the cost of 5,000 Penalty Victory Points, virtually guaranteeing a poor finish.
Pregame Setup Phase One

The Soviet deployment area is located at the top right corner of the map with the units organized by the scenario designer. The area is split north to south by the Hunte River which runs the length of the map, and the Ohre River which runs partially east to west across a third of the map. The entire focus of the mission is on the island that these two rivers carve out surrounding the town of Scheider, which is where both Victory Point locations reside.
The pop-up message in the above image is regarding several units out front that are locked in place by the scenario designer. I do not understand the rationale for this as personally I find it an annoyance that detracts from the game play. If some mission creation trick needs to be orchestrated to resolve some concern, it should be passive and not aggressively put in the players face such as this.
Objectives (Victory Points)

The Soviet 117th Guards Motorized Rifle Regiment begins the scenario in control of both objective hexes worth a total of 7,500 points. These locations are centered on the town of Scheider which is accessible by one bridge crossing to the west over the Hunte River and two crossings to the south over the Ohre River.
Pregame Setup Phase Two

My strategy for this scenario is effectively being dictated to me by the scenario designer. I am already in control of the objectives and I need to prevent NATO from taking them (all the while minimizing my unit loss as much as possible given the cards I have been dealt, that being a defensive holding action).
Although there are several locked units as mentioned above, there is a potential bug in the game that allows orders to be issued to them anyway, and here I take advantage of that by the following modifications (it is not a cheat as they are still locked meaning I cannot drag and drop them to a different deployment area):
- RC/117 Gds MRR (3 X T-80U [m]) is changed from Screen to Hold.
- 2/RC/117 Gds MRR (4 X BRDM-2 [g]) is changed from Screen to Hold.
The reason for this is that these units are already located in a spot that has excellent line-of-sight to the most likely approach by NATO.
3/RC/117 Gds MRR (4 X BRDM-2 [g]) is ordered to Move - Hasty to hex 3208 and Hold.
These three units out front on the opposite side of the Hunte River from the main body are pawns that are being sacrificed from the outset to delay the American advance. There is no realistic expectation to rush them across the bridge before they are overrun by NATO forces.
The three APC companies (1/2/3)/1/117 Gds MRR are ordered to Move - Hasty to hexes 3308, 3407, 3408 and Hold to form a wedge facing west at the bridgehead.
The two AT sections (1/2)/1/117 Gds MRR are ordered to Move - Hasty to hexes 3507, 3509 and Hold to fill out the wedge being set by the APC’s. These locations offer good LOS to the crossing point and should allow for maximum fire to be brought to the leading edge of the enemies anticipated advance.
- Mtr/1/117 Gds MRR (6 X 120mm towed mortar) is ordered to Move - Hasty to hex 3907 and then to go into On Call firing mode.
- AA/1/117 Gds MRR (3 X SA-16 Gimlet) is ordered to Move - Hasty to hex 3909 and Screen.
- All HQ units are changed from Hold to Screen (if not already set that way).
The three platoons of off map artillery (24 X 2S1 Gvozdika 122mm D-30) are ordered to barrage with Suppression Fire at hexes 2207, 2108, and 2008. These are along the curve of the K73 roadway running into Scheider and are a likely location of advance units for NATO.
Combat Action

Cycle 1 (31 minutes): At 15:10 first contact was made with the leading edge of the NATO assault. The Americans reached the bridgehead at the Hunte River at 15:17 and then crossed three minutes later, bringing several counters over before the cycle ended. The reconnaissance forces on the west bank were completely overrun and virtually eliminated, barely delaying the American advance towards Scheider.
Losses: Warsaw Pact 11/10 (Fallen Out/Destroyed), NATO 18
Additional Orders:
- 1/AT/117 Gds MRR (3 X AT-4) to Move - Hasty to hex 3507 and Hold.
- 2/AT/117 Gds MRR (3 X AT-4) to Move - Hasty to hex 3509 and Hold.
- 2-AA/117 Gds MRR (4 X 2S6 Tunguska) to Move - Hasty to hex 3905 and Screen.
The three platoons of off map artillery are ordered to barrage with Neutralizing Fire at hexes 3008, 3108, and 3208.
The remaining three orders this cycle are used to break up the pack of HQ units that have pooled together on the extreme right edge of the map, sending them to various cover with Screen orders.

Cycle 2 (60 minutes): By 15:49 the initial wave of American armor that crossed the bridge had been eliminated. At 16:29 the first NATO helicopters were sighted coming up the K73 roadway towards the Hunte River.
Losses: Warsaw Pact 30/18, NATO 33
Additional Orders: At this point I need to make a decision on how to use the reinforcements that arrived at 16:02. Do I use them to shore up the forward defensive wedge surrounding the 2,500 Victory Point objective hex 3508, or do I use them to form a second layer just behind that to guard the 5,000 VP objective at hex 3908?
While I am tempted to reinforce the front line given that the initial assault has been repulsed and there are no sighted NATO units on my side of the bridge at the moment, I doubt that will be the case when the reinforcement units arrive at their destination. Instead of having the transports destroyed in transit before they have a chance to deploy, I opt for the second choice of building a layered defense.
- 1/2/117 Gds MRR (11 X BTR-80 [g]) to Move - Hasty to hex 3709 and Hold.
- 2/2/117 Gds MRR (11 X BTR-80 [g]) to Move - Hasty to hex 3707 and Hold.
- 3/2/117 Gds MRR (11 X BTR-80 [g]) to Move - Hasty to hex 3708 and Hold.
- 1/AT/2/117 Gds MRR (2 X AT-4, 2 X RPG-29, 1 X SPG-9) to Move - Hasty to hex 3707 and Hold.
- 2/AT/2/117 Gds MRR (2 X AT-4, 2 X RPG-29, 1 X SPG-9) to Move - Hasty to hex 3709 and Hold.
- AA/2/117 Gds MRR (3 X SA-16 Gimlet) is ordered to Move - Hasty to hex 4009 and Screen.
- 3/AT/117 Gds MRR (3 X AT-4) to Move - Hasty to hex 3908 and Hold.
- AA/117 Gds MRR (4 X SA-8 Gecko) to Screen in place at 4607.
- Mtr/2/117 Gds MRR (6 X 120mm towed mortar) to Move - Hasty to hex 4105 and then to go into On Call firing mode.
One platoon of off map artillery is ordered deploy Smoke on hexes 3407 and 3408, and although I have two orders remaining this cycle I opt to leave the other two platoons in On Call firing mode.

Cycle 3 (45 minutes): At 16:38 2-AA/117 Gds MRR (4 X 2S6 Tunguska) was eliminated by artillery fire. By 16:47 the second line of defense around the 5,000 VP objective was in place and has dug in. During the cycle there was no incursion of NATO forces that I was able to detect. The Smoke deployment on the leading edge of my defense dissipated at 17:05; however no American units were sighted on my side of the river.
Losses: Warsaw Pact 34/19, NATO 35
Additional Orders:
- 1/4/117 Gds MRR (13 X T-80U [m]) to Move - Hasty to hex 3809 and Hold. This location is utilizing available concealment (80 rating at hex 3809) that also provides excellent line-of-sight to the southern bridge crossings along the Ohre River, which could come into play should NATO decide to divert some forces there to flank my alignment.
- 2/4/117 Gds MRR (13 X T-80U [m]) to Move - Hasty to hex 3707 and Hold.
- 3/4/117 Gds MRR (13 X T-80U [m]) to Move - Hasty to hex 3709 and Hold.
- HQ 4/117 Gds MRR (1 X T-80U [m]) to Move - Hasty to hex 3908 and Screen.
- Mtr/2/117 Gds MRR (6 X 120mm towed mortar) to deploy Smoke at hexes 3407 and 3408.
- A/C Mig 23 Flight 1 (2 X Mig-23MF Flogger) to perform an Air Strike at hex 2808 with a two hex Discretionary Target Zone Radius.
All artillery units are left in On Call status.

Cycle 4 (45 minutes): The Air Strike at 17:31 was very successful, scoring six kills on self-propelled artillery units with no losses to the aircraft that ran the sortie. Two of the tank companies sent forward stopped short of my intended location, possibly due to stacking limitations inherent with the game engine.
Losses: Warsaw Pact 52/22, NATO 41
Additional Orders:
- 3/4/117 Gds MRR (13 X T-80U [m]) to Move - Hasty to hex 3808 and Hold.
- A/C Mig 23 Flight 1 (2 X Mig-23MF Flogger) to perform an Air Strike a hex 3307 with a two hex Discretionary Target Zone Radius.
- A/C Mig 23 Flight 2 (2 X Mig-23MF Flogger) to perform an Air Strike a hex 2806 with a two hex Discretionary Target Zone Radius.
One platoon of off map artillery is ordered to barrage with Suppression Fire at hexes 3008, 3108, and 3208, and one other is ordered to barrage with Neutralizing Fire at hex 0506 where an enemy HQ was reported during the previous cycle.
Although I have eight additional orders left to give this cycle, I opt not to disrupt the deployment that I currently have.
If it is not broke, well…

Cycle 5 (44 minutes): The Warsaw Pact took a punishing blow in the form of NATO artillery during the cycle, with significant losses to multiple units. HQ 117 Gds MRR (which had screened all the way northeast to hex 4401) took a beating out in the open.
Losses: Warsaw Pact 62/23, NATO 59
Additional Orders: Although a section of SS-21 SSM [N] nuclear surface-to-surface missiles arrived as a reinforcement during the cycle, I have no intention of utilizing them at the moment due to the high penalty cost involved (5,000 Victory Points).
- HQ 117 Gds MRR (the battlefield commander) to Move - Hasty to hex 4108 and Screen.
- HQ AT/2/117 Gds MRR (1 X BTR-80 [g]) to Move - Hasty to hex 3913 and Screen. This is an observation point located at one of the two bridges along the Ohre River which effectively shifts the unit into a reconnaissance role. The location provides excellent LOS to the approach from the south and west.
- A/C Mig 23 Flight 2 (2 X Mig-23MF Flogger) to perform an Air Strike a hex 2509 with a two hex Discretionary Target Zone Radius.
One platoon of off map artillery is ordered to barrage with Neutralizing Fire at hexes 706, 806, and 906.
There are nine orders going unused this cycle: while this may seem wasteful, the table is set the best I see it for the moment given the information presented to me.

Cycle 6 (46 minutes): The Air Strike occurred at 19:07 and revealed a mass of units in the center of the map on the west side of the Hunte River, however I did not detect if anything was destroyed (I did not lose any aircraft during the sortie). A number of NATO anti-tank units have appeared on the opposite bank outside of Olderup and have drawn the attention of On Call artillery units.
Losses: Warsaw Pact 64/23, NATO 67
Additional Orders:
The right shoulder of the defensive wedge covering the 2,500 VP objective has been substantially weakened by artillery fire and is down to just two vehicles from an AT section. In order to shore this up I dispatch 3/4/117 Gds MRR (13 X T-80U [m]) to hex 3507 to Hold upon arrival.
One platoon of off map artillery is ordered deploy Smoke on hexes 3407 and 3507.
Losses: Warsaw Pact 64/23, NATO 67
Additional Orders:
The right shoulder of the defensive wedge covering the 2,500 VP objective has been substantially weakened by artillery fire and is down to just two vehicles from an AT section. In order to shore this up I dispatch 3/4/117 Gds MRR (13 X T-80U [m]) to hex 3507 to Hold upon arrival.
- A/C Mig 23 Flight 1 (2 X Mig-23MF Flogger) to perform an Air Strike a hex 3006 with a two hex Discretionary Target Zone Radius (this is where the sighted AT units are).
- A/C Mig 23 Flight 2 (2 X Mig-23MF Flogger) to perform an Air Strike a hex 2308 with a three hex Discretionary Target Zone Radius (this is where a large mass of forces were detected during the cycle).
One platoon of off map artillery is ordered deploy Smoke on hexes 3407 and 3507.

Cycle 7 (43 minutes): The second sortie to the center of the map revealed a mass of American armor on the K73 roadway. Should this force venture towards the bridge crossing on the Hunte River I believe that I am well situated to check, if not outright repulse any foray towards the town of Scheider.
Losses: Warsaw Pact 68/24, NATO 80
Additional Orders:
A/C Mig 23 Flight 2 (2 X Mig-23MF Flogger) to perform an Air Strike a hex 2308 with a three hex Discretionary Target Zone Radius.
One platoon of off-map artillery is ordered to barrage with Neutralizing Fire at hex 3006.
The tank company that I ordered to shore up the right shoulder of the front defensive wedge reverted to a Hold posture for some reason. I reissue the Move - Hasty order to hex 3507 to Hold upon arrival.
While this leaves me with a total of 10 orders remaining for the cycle, I have not received any viable reason to budge from my current deployment. Nothing is approaching from the south, and the sighted units have been assigned either Air Strikes or Neutralizing Fire artillery barrages.
The other two off-map artillery units have high ammunition stores that I intend to reserve for the moment should a thrust be detected from NATO.

Cycle 8 (42 minutes): To say the turn went by quickly would be a crass understatement. The sortie to the center of the map revealed the tanks again, however I am not seeing any explosive animation as if they are launching any munitions. The artillery barrage on the lone AT unit eliminated it from the map.
Losses: Warsaw Pact 68/24, NATO 81
Additional Orders:
- A/C Mig 23 Flight 1 (2 X Mig-23MF Flogger) to perform an Air Strike a hex 2208 with a two hex Discretionary Target Zone Radius (these units have high ammo stores and I cannot figure out why they are not firing on the enemy armor, so I am reducing the discretionary amount back down to two).
- A/C Mig 23 Flight 2 (2 X Mig-23MF Flogger) to perform an Air Strike a hex 2008 with a two hex Discretionary Target Zone Radius.
The tank company that I had ordered to relocate twice has again reverted to Hold at its current location. The Readiness and Ammo are high, and the Morale is acceptable so I simply do not understand what the issue is. If it is a stacking limit problem and the game engine is overriding the order, it would be nice to have some sort of indication.
At this point with no units sighted north of Scheider I effectively cancel the effort altogether.

Cycle 9 (39 minutes): At 21:03 battlefield conditions changed to dusk, and several minutes later A/C Mig 23 Flight 2 was shot down during their sortie to the center of the map, not having registered a single kill. This makes the third straight Air Strike ordered in that area with zero explosive animations and no kills to claim, at the loss of two aircraft.
Losses: Warsaw Pact 68/26, NATO 81
Additional Orders:
All off-map artillery is ordered to barrage with Suppression Fire at the following hexes: 2008, 2009, 2108, 2107, 2206, 2207, 2407, 2308, and 2207.

Cycle 10 (38 minutes): Other than changing from dusk to night at 22:00 there were no significant developments to speak of. It is quite possible that the NATO attack has been checked and they have fallen back to lick their wounds.
Losses: Warsaw Pact 68/26, NATO 85
Additional Orders: For the first time in this scenario I am letting a cycle pass without issuing any new orders. I do not want to risk losing a unit and the valuable Victory Points that go along with it.

Cycle 11 (37 minutes): Neither side experienced a loss during the cycle, and with only 10 minutes remaining in the battle I am confident that my holding action was valid and effective.

Cycle 12 (10 minutes): At 23:00 (8:00 elapsed scenario time) the battle is declared over with an 89% Warsaw Pact Decisive Success outcome.
After-action Reports

The Staff Summary Report tab indicates that the scenario ended with the Soviets securing an 89% Decisive Success outcome with forces at 81% of starting. Given the mission dictated to the Soviets this is an amazing result that I am very much pleased with.
The total losses (VP) for both sides were: NATO 1,431 and the Warsaw Pact 3,976, with the Red Army taking 7,500 Victory Point Locations for a total score of 11,476 to 1,431.
Vodka for everyone!!
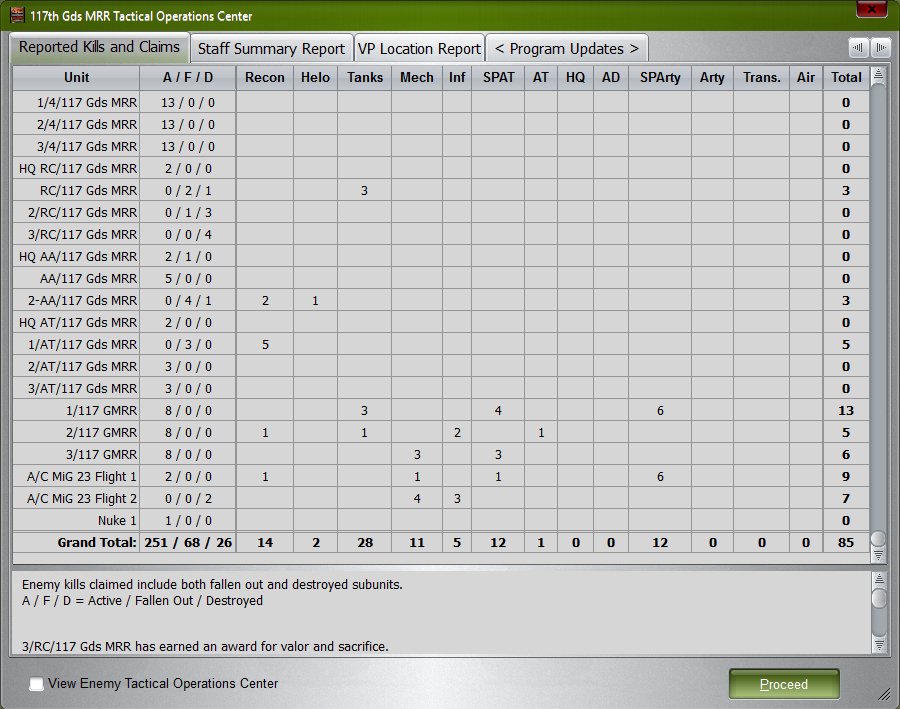
The Reported Kills and Claims tab details the results of the battle in spreadsheet format. The Warsaw Pact ended with 251 Active, 68 Fallen Out, and 26 Destroyed units. NATO ended with 245 Active, 69 Fallen Out, and 16 Destroyed units for a total loss of 85 units.
The standout group was 2/1/117 Gds MRR (BTR-80 [g]) which accounted for a total of eight kill claims (seven of those being NATO tanks) with a loss of 14 vehicles (11 fallen out and three destroyed).

The Staff Summary Report tab for the Americans indicates their horrific failure at an 11% rating with forces at 57% of starting. This operation for NATO was a catastrophe at both the strategic and tactical level: they failed to neutralize the Warsaw Pact ammunition dump, and in their abysmal effort they also lost approximately 45% of their total force.
Not a good day at the office.
Review Final Situation

Full size image available here.
The American commander left a significant portion of his fighting force on the west bank of the Hunte River. Had just one of the two full tank companies routed south and then north from the outset, they would have crossed the Ohre River with little resistance and would have been able to prosecute my extreme left flank which may have caused me to pivot some amount of my force in that direction to address the incursion.
Two mechanized companies were also left out in the wilderness and could have been used to crack my layered defense. Had I that force at my disposal, I would have crossed the amphibious M113A1 APC’s far north and come down south on the right flank, creating a double envelopment of the Soviets.
This scenario was played on 3/11-12/16 on a Windows 10 machine and scheduled to be published on 3/14/16.
No comments:
Post a Comment
Note: Only a member of this blog may post a comment.