

Soviet High Command has deemed the town vital to the supply of ongoing combat operations and has directed the East Germans to road march to the vicinity and immediately launch an attack to secure a bridgehead across the Rensen River. If the town cannot be taken and held, tactical battlefield nuclear weapons have been authorized to deny it to the enemy,
The scenario is a conversion from the original game Flashpoint Germany in which it was titled "Thin Blue Line". In this incarnation I will be playing as the Warsaw Pact commander. Click here for my NATO AAR from that game for this scenario.
Game Options

Everything is unchecked except for FSCC control (which allows subordinate AI to utilize indirect fire support during turn resolution) and LOS checks (which allows the human player to evaluate the tactical feasibility of a specific hex).
Friendly Forces
21 Recce, 8 Helo, 95 Tank, 45 APC, 45 Inf, 3 AT, 24 HQ, 8 AD, 54 SPArty, 6 Arty, 22 Utility, 2 Air, 1 WMD.
Enemy Forces
The 33rd Armoured Brigade is expected to relieve the remnants of the 1st Staffordshire Regiment.
Critical Units

The T-72B [m] Main Battle Tank features a 125mm 2A46 smoothbore cannon as well as the AT-11 Sniper guided anti-tank missile. I will have 95 of these units at 78 Victory Points each for a total of 7,410 points (these are later cycle reinforcements and none are available at the start of the scenario).

The Mi-24P Hind Attack Helicopter features a 30mm GSh-30K autocannon, the AT-6 Spiral radio guided anti-tank missile, and 80mm S-8 HEAT anti-armor unguided rockets. I will have eight of these units at 106 Victory Points each for a total of 848 points (these are later cycle reinforcements and none are available at the start of the scenario).

The BM-21 Grad self-propelled rocket launcher features the 122mm rocket with an additional fire mission type, Saturation Fire (7 X) that can be a battlefield game changer if used judiciously. I will have 12 of these units at 49 Victory Points each for a total of 588 points (these are later cycle reinforcements and none are available at the start of the scenario).
Pregame Setup Phase One

The East German deployment area is located near the top right corner of the map with the units organized by the scenario designer. I start out with the most minimal forces yet, one superior HQ and a reconnaissance company.
The twist here is I am playing as the East Germans, and while this is quite interesting I would have preferred if the developer went one step further and created a separate counter color scheme for these units to separate them from the Soviets (much like the British are colored differently than the Americans).
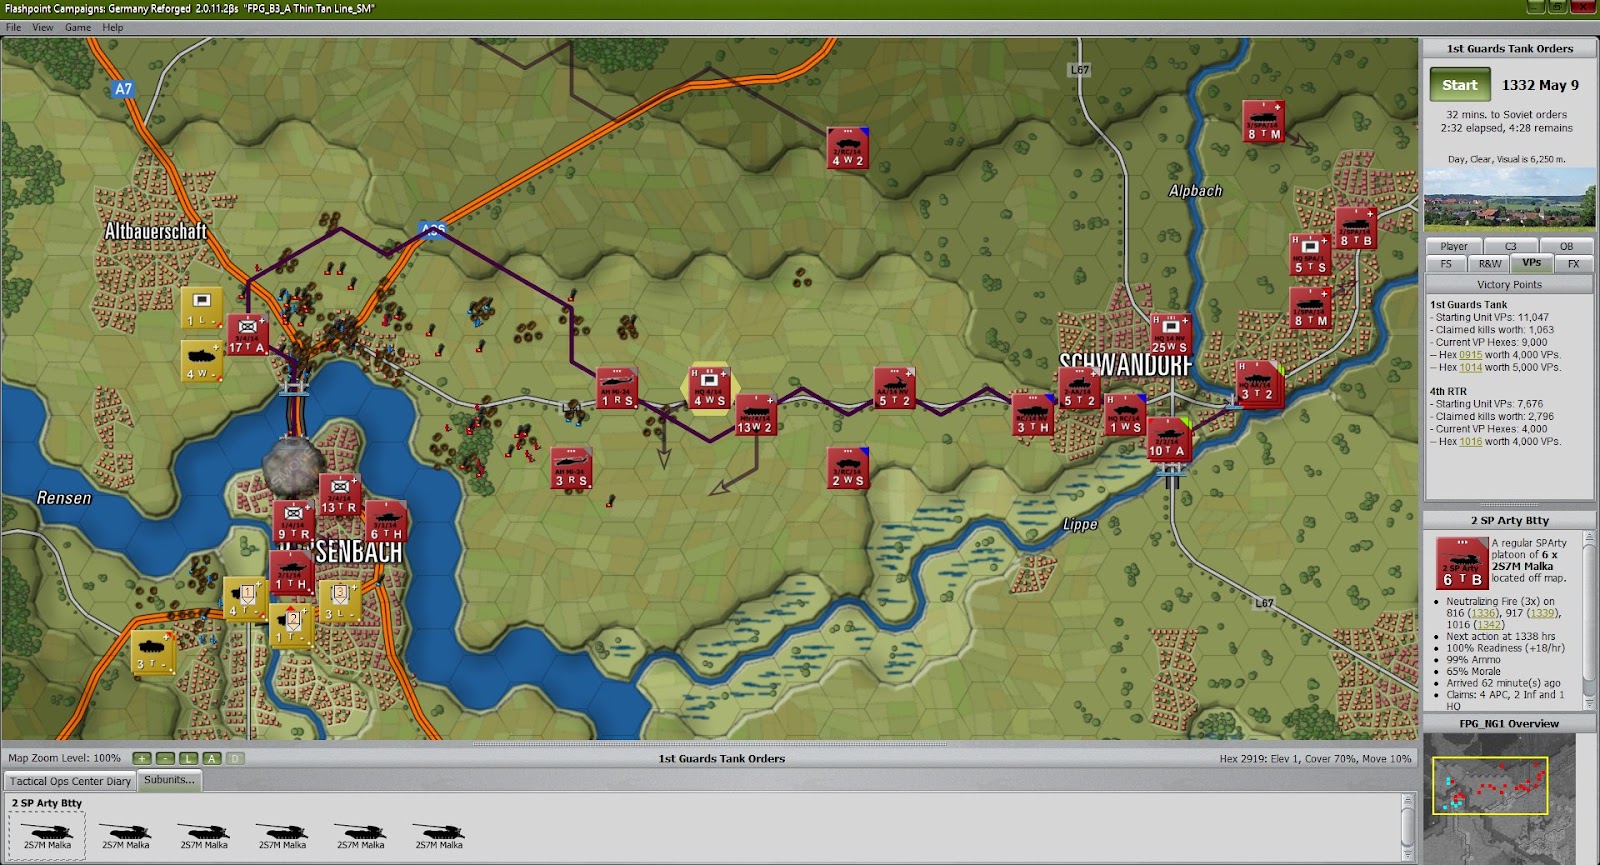
Objectives (Victory Points)

The 7th East German (NVA) Tank Division begins the scenario quite a distance from the objective hexes that reside in the town of Rensenbach which is currently controlled by the British 33rd Armoured Brigade.
There are three Victory Point locations worth a total of 13,000 points.
A Bridge Too Costly?

The three Victory Points are located on the opposite side of the Rensen River with only one existing crossing point on the map, a long bridge that runs north to south. Timing is everything in this scenario as the NATO reinforcements during later cycles can cut the Warsaw Pact off should they not clear the bridgehead soon enough.
My first AAR for this scenario involved sending units south to create bridging to cross for a vertical assault, however that took far too much time allowing the British to reinforce from the north and west which spelled disaster for my carefully laid plans.
Pregame Setup Phase Two

The units are stacked at the forward edge of the setup boundary and are ordered to disperse to locations with sufficient line-of-sight to detect any British probe coming from the west. The superior HQ unit is relocated to the town of Schwandorf to allow their Command Radius to cover the area of operations.
My strategy for this scenario is to rush all combat units to cross the bridgehead and move forward to capture the two Victory Point objectives in the north. If there is luck and opportunity on my side, I may slip a unit further south to capture the third objective.
Keep It Simple Stupid.
Combat Action

Cycle 1 (22 minutes): The reconnaissance units reached their destinations while a British unit has been spotted in the open just north of the L141.
Losses: Warsaw Pact 0/0 (Fallen Out/Destroyed), NATO 0
Additional Orders: Although I have three orders available this cycle, I have no artillery support yet and I do not wish to change the current plan. The recon element was sent forward with Assault orders and can engage the NATO unit if they are able to.

Cycle 2 (25 minutes): During the cycle some shots were traded between the recon units, however no losses were incurred. The first wave of reinforcements arrived in the northwest where the on map artillery units began barraging the British unit causing it to scoot away.
Losses: Warsaw Pact 0/0, NATO 0
Additional Orders: There are seven orders available to me this cycle.
- Stack 1/1/14 NVA and 2/1/14 NVA (20 X T-72B [m]) to Assault to hexes 0912 and 0916 and then Hold (one hex past the 4,000 Victory Point objective).
- Stack 3/1/14 NVA and HQ 1/14 NVA (11 X T-72B [m]) to Assault to hexes 0912 and 1115 and then Hold (one hex past the 5,000 Victory Point objective).
- 1/4/14 NVA (13 X BMP-2 [m]*) to Assault to hexes 0912 and 0915 and then Hold (the 4,000 Victory Point objective).
- 2/4/14 NVA (13 X BMP-2 [m]) to Assault to hexes 0912 and 1014 and then Hold (the 5,000 Victory Point objective).
- 3/4/14 NVA (13 X BMP-2 [m]) to Assault to hexes 0912 and 1015 and then Hold (this is a line filter between the two objectives).
- AH Mi-24P Flight 1 (4 X Mi-24P Hind) to Move - Deliberate to hexes 2114 and 1614 and then Screen.
- AH Mi-24P Flight 2 (4 X Mi-24P Hind) to Move - Deliberate to hexes 2211 and 1611 and then Screen.
* These units also contain the following embarked units: 9 X Mechanized Rifle/2 X 30mm AGS GL/4 X Heavy MG/1 X AT-3 Sagger/1 X HQ.

Cycle 3 (21 minutes): The attack helicopters were able to eliminate several NATO vehicles that were screening out in front in a reconnaissance capacity, so that should reduce the amount of artillery fire falling on or around my support contingent.
Losses: Warsaw Pact 0/0, NATO 6
Additional Orders: There are seven orders available to me this cycle.
- Mtr/4/14 NVA (6 X 2B9 Vasilek) to Move - Hasty to hex 2410 and go into On Call firing mode.
- HQ 4/14 NVA (multiple) to Move - Hasty to hex 1812 and Screen (this is the HQ unit for the mechanized infantry being sent into Rensenbach).
- 1/SPA/14 NVA (6 X 2S1 Gvozdika) to Move - Hasty to hex 2911 and go into On Call firing mode.
- 2/SPA/14 NVA (6 X 2S1 Gvozdika) to Move - Hasty to hex 2909 and go into On Call firing mode.
- 3/SPA/14 NVA (6 X 2S1 Gvozdika) to Move - Hasty to hex 2907 and go into On Call firing mode.
- HQ SPA/14 NVA (multiple) to Move - Hasty to hex 3110 and Screen*.
- A/C SU-25 (2 X Su-25 Frogfoot) to perform an Air Strike on hex 1011 with a two hex Discretionary Target Zone Radius (this is near the northern end of the bridgehead).
*This moves the on-map artillery contingent forward enough so that their maximum fire area covers the entire area of operations.

Cycle 4 (24 minutes): NATO scored their first kills of the scenario, taking out three of my attack helicopters as well as a reconnaissance vehicle. The Frogfoot airstrike was very successful, claiming kills of four APC and three infantry.
Losses: Warsaw Pact 1/4, NATO 13
Additional Orders: There are seven orders available to me this cycle.
- A/C SU-25 (2 X Su-25 Frogfoot) to perform an Air Strike on hex 1011 with a two hex Discretionary Target Zone Radius.
- 1 SP Arty Btty (6 X 2S7M Malka) to barrage with Neutralizing Fire on hexes 0912, 0913, and 0914 (this is the entire span of the bridge from top to bottom).
- 2 SP Arty Btty (6 X 2S7M Malka) to barrage with Neutralizing Fire on hexes 0912, 0913, and 0914 (this is the entire span of the bridge from bottom to top).
- AH Mi-24P Flight 1 (3 X Mi-24P Hind) to Move - Deliberate to hex 1713 and Screen.
- AH Mi-24P Flight 2 (2 X Mi-24P Hind) to Move - Deliberate to hex 1812 and Screen.
This will leave two orders not issued this cycle.

Cycle 5 (30 minutes): NATO put up a fierce wall at the bridgehead, however my assault forces were able to reroute around it with great success and break through onto the river crossing. My Frogfoot airstrike was called off due to a change in the weather conditions, now light rain with visibility having dropped to 2,000 meters . NATO did not encounter such a hindrance as their air assets were able to strike mercilessly at my mechanized infantry out in the open, in the rain.
Losses: Warsaw Pact 36/13, NATO 41
Additional Orders: There are 10 orders available to me this cycle.
- Stack 1/2/14 NVA and 2/2/14 NVA (20 X T-72B [m]) to Assault to hexes 0912 and 0916 and then Hold (one hex past the 4,000 Victory Point objective).
- Stack 3/2/14 NVA and HQ 2/14 NVA (11 X T-72B [m]) to Assault to hexes 0912 and 1115 and then Hold (one hex past the 5,000 Victory Point objective).
- 2-AA/14 NVA (4 X 2S6 Tunguska) to Move - Hasty to hex 2212 and Screen (this unit has a monster maximum firing range of 18 hexes and should be able to cover the entire Victory Point area from its assigned hex).
- AA/14 NVA (4 X SA-13 Gopher) to Move - Hasty to hex 1714 and Screen.
- HQ AA/14 NVA (multiple) to Move - Hasty to hex 2913 and Screen.
- 3 SP Arty Btty (6 X 2S7M Malka) to barrage with Neutralizing Fire on hexes 0915, 1014, and 1115 (from right to left).
- 4 SP Arty Btty (6 X 2S7M Malka) to barrage with Neutralizing Fire on hexes 0915, 1014, and 1115 (from left to right).
- Mtr/4/14 NVA (6 X 2B9 Vasilek) to Move - Hasty to hex 1814 and go into On Call firing mode (this brings them within the area of operations).
- 3/SPA/14 NVA (6 X 2S1 Gvozdika) to deploy a Smoke Screen at hexes 0914, 0915, and 1014 (the usefulness of which is questionable given the poor weather conditions).
Cycle 6 (30 minutes): During the cycle the first assault wave made it into Rensenbach and managed to secure both the 4,000 and 5,000 Victory Point objectives, but not without heavy losses. Fortunately for the Warsaw Pact, the NATO force defending the town paid a much higher price.
Losses: Warsaw Pact 57/25, NATO 100
Additional Orders: There are eight orders available to me this cycle.
- 2/RC/14 NVA (4 X BRDM-2 [g]) to Move - Hasty to hexes 1506 and 1105 and then Hold (this is a reconnaissance unit that I am moving up to the edge of the forest in order to observe any enemy reinforcements coming from the north).
- A/C SU-25 (2 X Su-25 Frogfoot) to perform an Air Strike on hex 0816 with a two hex Discretionary Target Zone Radius (the weather has improved to clear conditions with 6,250 meters of visibility).
- SP Rocket Battery 1 (6 X BM-21 Grad) to deploy FASCAM (minelets) at hex 0717 (this is just beyond a bridge crossing point that western reinforcements would need to take into Rensenbach).
- SP Rocket Battery 2 (6 X BM-21 Grad) to deploy FASCAM (minelets) at hex 0709 (this is the main highway running south through Altbauerschaft).
- 1 SP Arty Battery (6 X 2S7M Malka) to barrage with Neutralizing Fire on hexes 0816, 0917, and 1016 (this is the wedge of British troops surrounding my southernmost units). The spread is right to left.
- 2 SP Arty Battery (6 X 2S7M Malka) to barrage with Neutralizing Fire at the same locations, however the spread is left to right.
- 2/SPA/14 NVA (6 X 2S1 Gvozdika) to deploy a Smoke Screen at hex 0916 (the southernmost unit in Rensenbach).
This will leave one order not issued this cycle.

Cycle 7 (32 minutes): My initial assault wave into Rensenbach looked well situated until a NATO airstrike took out six T-72 tanks that were holding in hex 1115. Additional British units began pouring south across the bridgehead to come up behind my force arrayed on the northernmost Victory Point objectives while the second assault wave continued to make its way to the crossing point.
Losses: Warsaw Pact 63/26, NATO 117
Additional Orders: There are eight orders available to me this cycle.
- The two attack helicopter troops are experiencing either low morale or readiness, so I bring them back towards the HQ to Resupply.
- A/C SU-25 (2 X Su-25 Frogfoot) to perform an Air Strike on hex 0816 with a two hex Discretionary Target Zone Radius.
- SP Rocket Battery 1 (6 X BM-21 Grad) to barrage with Saturation Fire (7X) at hex 0717 (this is a large mass of British units to the southeast of the town).
- SP Rocket Battery 1 (6 X BM-21 Grad) to barrage with Saturation Fire (7X) at hex 0115 (this is the general area where I suspect a superior HQ to be located).
- 3 SP Arty Battery (5 X 2S7M Malka) to barrage with Neutralizing Fire on hexes 0812 and 0914 (this is north of the crossing point).
- 4 SP Arty Battery (6 X 2S7M Malka) to barrage with Neutralizing Fire on hexes 0717, 0816, and 0917(from right to left).

Cycle 8 (30 minutes): The second assault wave has crossed the bridge into Rensenbach and is moving to shore up the two Victory Point objectives in the northern part of town that I am so tenuously holding onto at the moment. During the cycle both of the attack helicopters that were supposed to be returning to HQ engaged enemy units and were ultimately wiped out.
However NATO continued to take severe losses due to direct and indirect fire and is continuing to have difficulty cracking the initial assault wave that rushed into the town.
Losses: Warsaw Pact 69/30, NATO 179
Additional Orders: There are eight orders available to me this cycle.
- 1/SPA/14 NVA (6 X 2S1 Gvozdika) to barrage with Suppression Fire at hexes 0716, 0717, and 0816.
- 2/SPA/14 NVA (6 X 2S1 Gvozdika) to barrage with Suppression Fire at hexes 0617, 0718, and 0817.
- 3/RC/14 NVA (2 X BRDM-2 [g]) to Move - Hasty to hexes 0903 and 1404 and then Hold (this is to augment the recon unit I already have watching to the north).
Given the supply status of the other artillery units I opt to leave the remaining six orders unissued during this cycle.

Cycle 9 (33 minutes): A great amount of artillery fire was exchanged during the cycle which did a lot of damage, but not as much as a NATO airstrike managed against one of the East German tank companies in taking out seven T-72 tanks.
Losses: Warsaw Pact 82/34, NATO 195
Additional Orders: There are seven orders available to me this cycle.
- Stack 1/3/14 NVA and 2/3/14 NVA (20 X T-72B [m]) to Assault to hexes 0912 and 1016 and then Hold (this is the 4,000 Victory Point objective in the south).
- Stack 3/3/14 NVA and HQ 3/14 NVA (11 X T-72B [m]) to Assault to hexes 0912 and 1015 and then Hold (this is one hex behind that objective).
- A/C SU-25 (2 X Su-25 Frogfoot) to perform an Air Strike on hex 0604 with a three hex Discretionary Target Zone Radius. One of the two recon units that were moved north to observe the roadway was destroyed during the cycle and I briefly saw a flash of a number of British units on their way south to Rensenbach.
- AA/14 NVA (4 X SA-13 Gopher) to Move - Hasty to hex 1414 and Screen. This unit has scored no kills while it should be within range to attack aircraft that are decimating my forces within Rensenbach. Perhaps bringing it closer to the action will allow for a more successful attack on an approaching aircraft; however it comes at the risk of drawing artillery fire.
- SP Rocket Battery 1 (6 X BM-21 Grad) to deploy FASCAM (minelets) at hex 0809 (this is an attempt to stall the advance of the NATO reinforcements coming from the north).
- SP Rocket Battery 2 (6 X BM-21 Grad) to barrage with Neutralizing Fire at hex 0115 (this is the most recently reported enemy HQ location).
- RC/14 NVA (3 X BRM-1K) to Move - Hasty to hex 1408 and Hold (this will provide excellent line-of-sight to the approaching British reinforcements).

Cycle 10 (28 minutes): At 15:18 I received a notification that losses have exceeded 50%. The airstrike to the north was successful with the Frogfoot flight taking out at least three British units without the loss of any aircraft. The recon unit moving north has revealed several NATO units moving south which I intend to concentrate artillery fire on.
Losses: Warsaw Pact 93/36, NATO 210
Additional Orders: There are seven orders available to me this cycle.
- 1/SPA/14 NVA (6 X 2S1 Gvozdika) to barrage with Suppression Fire at hexes 0403, 0404, and 0504.
- 2/SPA/14 NVA (6 X 2S1 Gvozdika) to Move - Hasty to hex 2910 and go into On Call firing mode. This unit has scooted so far to the east that it has taken itself out of firing range of the extreme western edge of the battle map.
- 3/SPA/14 NVA (6 X 2S1 Gvozdika) to barrage with Suppression Fire at hexes 0504, 0505, and 0506.
- Mtr/4/14 NVA (6 X 2B9 Vasilek) to Move - Hasty to hex 1615 and go into On Call firing mode (this brings the unit closer to the area of operations where the maximum fire area will cover all units to allow for a Smoke Screen deployment later).
This will leave three orders not issued this cycle.

Cycle 11 (28 minutes): Two of my recon units were destroyed in the north, however I still have visibility to a large mass of British troops thanks to a remaining observer in hex 1408. The assault wave is making its way west along the roadway and should be able to cross the river before NATO can engage them, however I intend to use artillery and air support to slow the enemies advance.
Losses: Warsaw Pact 99/40, NATO 232
Additional Orders: There are seven orders available to me this cycle.
- A/C SU-25 (2 X Su-25 Frogfoot) to perform an Air Strike on hex 0405 with a two hex Discretionary Target Zone Radius (this is one hex back from the head of the advance column moving south).
- SP Rocket Battery 1 (6 X BM-21 Grad) to barrage with Suppression Fire at hexes 0404, 0405, and 0406 (this is also at the head of the column).
- 1/SPA/14 NVA (5 X 2S1 Gvozdika) to Move - Hasty to hex 2910 and go into On Call firing mode. This unit has scooted so far to the east that it has taken itself out of firing range of the extreme western edge of the battle map.
- 3/SPA/14 NVA (5 X 2S1 Gvozdika) to Move - Hasty to hex 2908 and go into On Call firing mode (for the same reason above).
- 3 SP Arty Battery (4 X 2S7M Malka) to barrage with Suppression Fire on hexes 0403, 0404, and 0405.
- 4 SP Arty Battery (6 X 2S7M Malka) to barrage with Suppression Fire on hexes 0402, 0403, and 0404.
This will leave one order not issued this cycle.

Cycle 12 (28 minutes): At 16:15 I received a notification that losses have exceeded 40%. A NATO airstrike on my third assault wave took out the HQ unit and four T-72 tanks from the frontline unit. They did manage however to make it across the bridge and completely into Rensenbach without being caught and engaged by the large contingent of NATO forces coming down from the north.
Losses: Warsaw Pact 114/41, NATO 251
Additional Orders: There are five orders available to me this cycle.
- Mtr/4/14 NVA (6 X 2B9 Vasilek) to deploy a Smoke Screen at hex 0916.
- 2/SPA/14 NVA (6 X 2S1 Gvozdika) to barrage with Neutralizing Fire at hexes 0402, 0403, and 0404 (the long column of British units coming down the road).
All other units are either moving to assigned locations, barraging, or are in a Resupply status, which leaves three orders unissued this cycle.

Cycle 13 (28 minutes): At 16:40 the southernmost objective worth 4,000 Victory Points fell to the East Germans. At approximately the same time my final recon unit was eliminated blinding me to the NATO reinforcements about to stream across the bridge into the town.
Losses: Warsaw Pact 115/48, NATO 258
Additional Orders: There are five orders available to me this cycle.
- 2/4/14 NVA (13 X BMP-2 [m]) to Move - Hasty to hex 0914 and Hold. This is the southern end of the bridgehead and my intention is to have them blow the bridge the next chance I have to issue that unit an order.
- HQ 4/14 NVA (multiple) to Move - Hasty to hex 0912 and Hold. This is the northern end of the bridgehead and my intention is to have this disrupt the British advance into Rensenbach.
- A/C SU-25 (2 X Su-25 Frogfoot) to perform an Air Strike on hex 0608 with a three hex Discretionary Target Zone Radius.
- 1/SPA/14 NVA (5 X 2S1 Gvozdika) to barrage with Neutralizing Fire at hexes 0608, 0709, and 0710. This is along the roadway outside of Altbauerschaft where a FASCAM deployment has shifted from red to yellow indicating its usage.
- 2/SPA/14 NVA (5 X 2S1 Gvozdika) to barrage with Neutralizing Fire at hexes 0709, 0710, and 0810 (near the same location as referenced above).
While I have an SS-21 (Surface-to-Surface Nuclear Missile) available to me it comes at a cost of 5,000 Penalty Victory Points that I can ill afford to part with given my present force level. Given that Soviet High Command apparently has no issue with using a nuke to deny the area to the enemy should I fail, they shouldn't complain about my attempt to blow the lone bridge.

Cycle 14 (25 minutes): The units that I dispatched to block and perform bridging operations have both arrived at their assigned hexes without being engaged by NATO.
Losses: Warsaw Pact 117/48, NATO 263
Additional Orders: There are five orders available to me this cycle.
- 2/4/14 NVA (13 X BMP-2 [m]) to Blow Bridge at hex 0914 with a next action scheduled for 17:54 (beyond the next cycle of 24 minutes).
- HQ 4/14 NVA (multiple) to Blow Bridge at hex 0912 with a next action scheduled for 17:54 as well.
- Mtr/4/14 NVA (6 X 2B9 Vasilek) to deploy a Smoke Screen at hex 0912 (to cover HQ 4/14 NVA).
- SP Rocket Battery 1 (6 X BM-21 Grad) to barrage with Saturation Fire (7X) at hex 0215 (this is the general area where I suspect a superior HQ to be located).
- SP Rocket Battery 1 (6 X BM-21 Grad) to barrage with Neutralizing Fire at hexes 0608, 0709, and 0710.
This uses up all available orders for this cycle.

Cycle 15 (24 minutes): My forces in Rensenbach are holding against the British units trying to unseat them and I should be able to win this scenario barring some alarming turn of events.
Losses: Warsaw Pact 122/49, NATO 271
Additional Orders: There are five orders available to me this cycle.
All available artillery is directed to barrage with Neutralizing Fire against the two sighted NATO units below my deployment.

Cycle 16 (12 minutes): The game ends at the 7:00 with neither side having prompted a declaration (below 30%) to end the battle.
After-action Reports

The Staff Summary Report tab indicates that the scenario ended with the East Germans securing a 70% Decisive Success outcome with forces at 33% of starting.
The final score was 16,926 to 7,328. While NATO almost doubled the amount of points in enemy losses, I held all of the objectives at the end of the scenario for an additional 13K. Given the spread of % VPs based on the scenario design, I could have gone all the way down to a 56% rating and still scored a Decisive Success outcome.
Note: In the Post-Battle Evaluation text the third sentence includes “[a user scenario]”. I believe this is caused by saving the mission at various points. This scenario is one of the longest of the individual missions available in the game, and writing this detailed AAR took three days (two days of game play and an extra day to clean it up), so saving the game and coming back to it was a necessity.
Playing the scenario from start to finish in one session would not include that line on this panel.

The Reported Kills and Claims tab details the results of the battle in spreadsheet format. The Warsaw Pact ended with 160 Active, 125 Fallen Out, and 49 Destroyed units. NATO ended with 106 Active, 165 Fallen Out, and 89 Destroyed units for a total loss of 272 units (I realize the numbers do not add up here, however they usually do).

The standout group was 1/1/14 NVA Tank Regiment (T-72B [m]) which accounted for an astonishing 46 kills at the loss of four tanks fallen out and five destroyed. The sole surviving T-72 was given a citation for effectiveness and an extra ration of vodka.

The Staff Summary Report tab for the Americans indicates
their Decisive Loss outcome at a 30% rating with forces at 48% of starting.
Review Final Situation

Full size image is available here.
Although the East Germans suffered enormous losses in crossing the bridge early, the attack was at the weakest point of the British defense and before the battlefield flooded with the numerically superior NATO reinforcements in later cycles.
The Warsaw Pact effectively cut their forces in half and was able to chip away at the initial troops in Resenbach to secure the objectives that once captured, were never lost.
This scenario was played on 3/22-23/16 on a Windows 10 machine and scheduled to be published on 3/21/16 (a retroactive update to a losing effort).
No comments:
Post a Comment
Note: Only a member of this blog may post a comment.