

Little information is provided in the Soviet briefing regarding the enemy force composition and posture. For this I start the scenario on the American side and learn that I will be facing Task Force 5-18, 3rd Brigade of the 3rd Armored Division. The NATO force is arrayed in Sector 12 which is their primary objective as well as mine. They are to defend a horizontal line stretching from grid 30,20 to 40,20 and have mines deployed at grids 32,21 and 33,21. This is problematic* in that the Americans do not have to move anywhere: they can just stay in place dug-in waiting to repulse my assault.
My strategy is to avoid grinding my units down against this force in Sector 12 by drawing the enemy out of their dug-in positions and towards a defensive line that I will deploy at the pregame setup phase boundary line. This line will be formed by HQ / 1 / 244 MRR (-), with the other two battalions swinging out west and south, with one of them going all the way to Grafschaft then south to circle back underneath the enemy force.
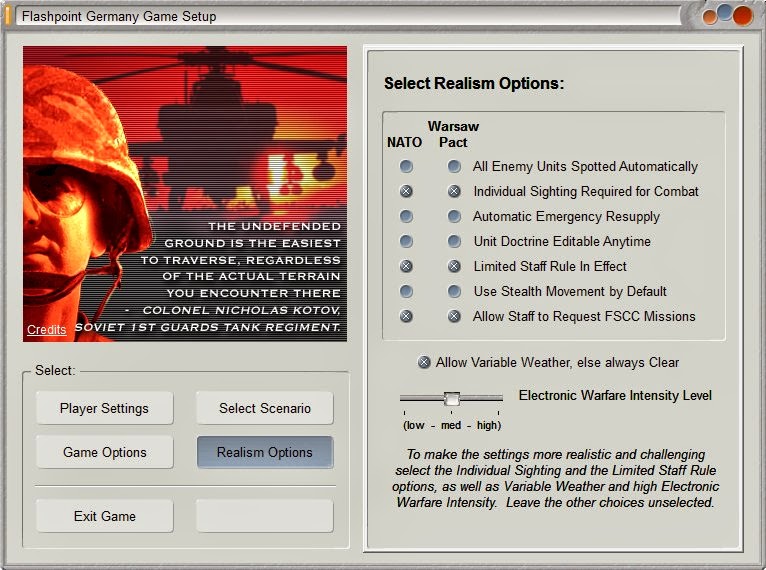
These are the realism settings that I am using for this
scenario. The Electronic Warfare Intensity Level is set at medium as I feel
that high goes way overboard (I would prefer issuing an order and having it get
jammed then from being prevented from issuing an order altogether).

Command Briefing Screen

Order of Battle Screen

Operational Field Battle Map

Aftermath Screen

This is the pregame setup phase where I can take the default
disposition of forces and drag and drop them where I like. I can also issue
orders at this point that will be executed immediately at the start of the game
(and avoiding the command lag time penalty and the staff order point costs
associated with giving these orders).
Pregame Setup Phase

These are my adjustments to default settings provided by the scenario designer: HQ / 1 / 244 MRR (-) is held back to form the defensive line to protect the on map boss HQ / 244 MRR. HQ / 2 / 244 MRR (+) is ordered to move far west to the bridge at grid 6,4 then far south to the bridge at grid 12,24 and finally to a staging area on the bottom of the map at grid 15,30 (it will take multiple turns for this component to reach that location and may require some re-tasking of units that break from the formation in order to screen due to standard SOP in place).
HQ / 3 / 244 MRR (+) is ordered to move to the west and then immediately south to the cover of the forested area in the middle of the map and finally the various on map artillery assets are moved to the locations with the greatest amount of cover as indicated by the yellow numbers in each grid.
Notable detachments: AT Plt / 2 / 244 MRR is taken from HQ / 2 / 244 MRR (+) and AT Plt / 3 / 244 MRR is taken from HQ / 3 / 244 MRR (+): both are used as part of the defensive line. CRP / 244 MRR is taken from FSE / 244 MRR and is ordered to move to the bridge at grid 34,13 where it will then be given an order to blow the bridge then revert to a hold posture.
Off map artillery assets are left at on call and counter battery orders.
As I know the NATO force has no air capability in this
scenario, the SAM unit at grid 37,10 is essentially a sacrificial lamb on the
defensive line.
Completion of Turn Five

During the first five turns I had to re-task four units from the movements west that remained in place in a hold posture to get them moving along (for some reason when I selected the entire stack/group they were not picked up).
CRP / 244 MRR managed to blow the bridge at grid 34,13 then was brought back to setup in a dug-in hold posture on the other side of the river.
During the turn resolution phase, the enemy HQ unit was located at grid 37,27: all artillery units are ordered to barrage this location using neutralizing fire.

Tactical Operations Center Staff Diary – Kills and Claims
for Warsaw Pact Forces
My survivors are listed on the left in the Grand Total row:
I lost three vehicles while killing five NATO vehicles (the far right Total
column). If I can maintain this positive ratio and continue to suck the
Americans out of Sector 12, there could be a reasonable outcome to this
engagement.

Staff Overview and Summary
The Victory Point total is 53 NATO and 5 Warsaw Pact.
Completion of Turn Ten

During the turn resolution phase there was a brief incursion into Sector Four where my main HQ unit and on map artillery are situated. This was repulsed however there is now a gaping hole on the right side of the defensive line I had formed. I order 2 Btty / 2 / 54 GAR (off map artillery asset) to deploy minelets at both ends of the bridge and directly on top of the offending unit at grid 37,13.
I order two SAM units (the sacrificial lambs mentioned earlier) to probe forward in cover to reveal any additional enemy units in Sector 12 before I launch a heavier probe forward into that area.

Tactical Operations Center Staff Diary – Kills and Claims for Warsaw Pact Forces
I have lost 26 vehicles and have claimed only 15 kills. The ratio has swung back the other way and although I have an advantage over the NATO force in terms of total vehicles, they fare rather poorly when going up against the better trained and equipped Americans.

Staff Overview and Summary
The Victory Point total is 26 NATO and 23 Warsaw Pact. At this point the Victory Point Balance meter is at 53% in favor of the NATO forces. They are no longer getting the 50 point credit for occupying Sector 12 so if the SAM probes go off reasonably well, I may rush one of the two battalions that I have on their left flank forward into the objective area.
Completion of Turn Thirteen

At this point I launch an attack into Sector 12 with HQ / 2
/ 244 MRR (+) utilizing as much cover as possible. Various artillery units are
ordered to directly support the defensive line in Sector 4 while the off map
artillery assets are ordered to continue dropping minelets across the bridges.
Completion of Turn Fifteen

While I am tempted to commit my reserve of the HQ / 3 / 244
MRR (+) hiding out in the forest area of Sector 7, I resist this temptation as
I know vehicle kills also equate to Victory Points and the Americans are quite
adept at night fighting.

Tactical Operations Center Staff Diary – Kills and Claims
for Warsaw Pact Forces
I have lost 29 vehicles and have claimed 23 kills: during
the past five turns that equates to losing three vehicles compared to killing
eight, a much more palatable ratio.

Staff Overview and Summary
The Victory Point total is 29 NATO and 31 Warsaw Pact. At this point the Victory Point Balance meter is at 51% in favor of the Warsaw Pact forces.
After-action Report

The game ends in a Tactical Warsaw Pact Victory outcome,
which I am satisfied with given the situation I was faced with and the forces I
had at my disposal.
Review Final Situation

My initial strategy of sucking the NATO forces out of their
dug-in positions worked as they moved north to engage my defensive line and
rear area support units. They destroyed the defensive line employed and laid
waste to my rear, however the Soviets still won the scenario, albeit at an
accelerated cost of vehicles in the final turns.

Tactical Operations Center Staff Diary – Kills and Claims
for Warsaw Pact Forces
In the final five turns I lost an additional 79 vehicles
while claiming only 18 additional kills on NATO forces. This horrible swing occurred
primarily because the Americans moved north, destroyed my defensive line and infiltrated
my support forces in the rear.

Staff Overview and Summary
The final Victory Point totals are 108 NATO and 229 Warsaw Pact, a difference of 121 points. This was not even close to the required greater than 180 points to achieve a Decisive Victory outcome and 15 points better than the 105 threshold for a Marginal Victory decision.
Post Mortem
*This scenario is severely lopsided in favor of the NATO forces. Playing it as the Soviets makes it one of the most challenging I have experienced in a computer war game in quite some awhile. The only time I played this as NATO, I simply left all of the units where they were (already in the objective area) and set them to dig-in and hold (a fight to the last man kind of order according to the game manual).
The scenario was won by turn 6 after destroying 198 Soviet vehicles and losing only 17 NATO vehicles. I just sat back, put most of the artillery on call and watched the Red Army disintegrate against the wall of NATO units.
I am not faulting the design team that put this together at all as such a scenario could very well play out in real life (and the Soviets have a demonstrable record of throwing their army units into a meat grinder). However in terms of game play, such a scenario is not necessarily enjoyable: for NATO is way too easy to win, and for the Warsaw Pact it is way too hard to obtain a tactical victory (and virtually impossible to win a decisive victory).
A well-played tactical battle as the Soviets might yield a draw. Such a result should be relished, especially if the player maximized all of the various realism sliders and settings in the game for the most painfully true-to-life experience.
No comments:
Post a Comment
Note: Only a member of this blog may post a comment.